Tuesday, March 30, 2010

Collage/Paper/Sculpture/Experiment!


copyright Red Nose Studio

Digital illustration isn’t limited to just drawing or painting in photoshop or illustrator— in this assignment I want you to explore the other ways we can create or use "digital" art with the additions of photography and/or collage. You will be making an illustration of a known mythological or fantasy creature with a foreground and background. Your creature/being can be from any culture --a norse god, manticore, japanese ghost, fairies, whatever, but it needs to be in an environment of some sort and it needs to be a KNOWN creature, and not just something you make up. Also, if you use photos, make sure they are YOUR photos, or definitely copyright free (i.e. vintage magazines or from a site that gives out specifically copyright-free images). I want you to take the pictures, not use what you find off google images.

Sketch stage will be due next week (since the process of gathering images or sculpting/etc. can be pretty intensive, you just need to bring in one "sketch"), and then your final is due the week after that. You can sculpt this creature and take photos of it, make a paper cut collage traditionally or digitally, add drawings to a photo, go out and take photos and then collage them together, then use the photo collage as reference for your final painting (digital or traditional), OR refine the collage so it looks great on its own, whatever. I leave it up to you, this is a very open assignment and I want you to branch out! You don’t necessarily need to bring in a pencil “sketch” next week, but you could bring in a rough collage, or a sculpture or paper cuts that you’ve made, whatever is the first step of the process you’d like to use. If you are working on putting together a digital collage or drawing over things digitally, you can show your process on the computer, you don't have to print it out. But you definitely need to show progress. This is a process-heavy assignment, so the more you do now the better! After critiques we will be using class time next week to work, so come prepared with your materials! If you are working traditionally bring tools, if you are working digitally, have all your files and photos, etc.

If you don’t have a digital camera, AV services said they have several that students can borrow. But, don’t try taking out a camera the night before or something, because other students may have checked them all out.

So here's some examples of illustrators using the Digital medium in different ways:

Vector art on top of photos-- Alberto Seveso

Digital illustration/color integrated with vintage photos-- David Plunkert

Paper cut art, digitally photographed/tweaked-- Jayme McGowan

Digitally collaged paper cut art (scanning papers, and then digitally cutting & collaging in photoshop)-- Sara Barnes

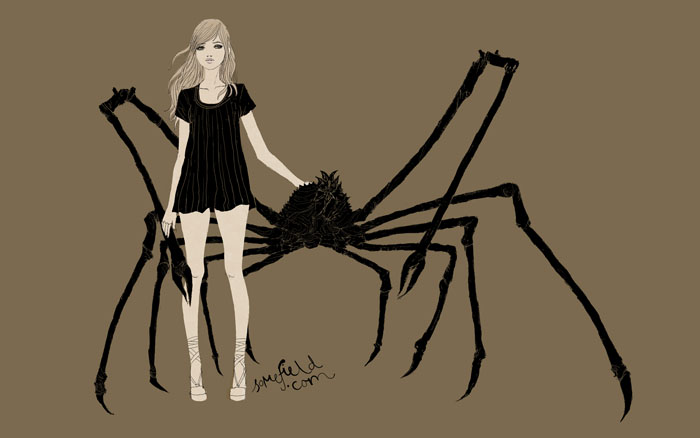
Traditionally sculpting, then photographing/tweaking for a "3d" illustration-- Red Nose Studio

Digitally drawing on top of photos-- Johan Thornqvist

Collaging photos/illustration digitally-- Maren Esdar

ALSO-- remember, you DON'T have to do a collage/sculpture/papercut for your final piece. You can always do one as a "sketch" and use it as reference for your final.
If you are using a collage as reference, you can probably get away with using magazine photos and other possibly-copyright photos, as long as they don't show up that way in the final. (like if you use a magazine girl's face as reference for the face you'd like to draw/paint)

BLOG assignment:
To get your feet wet, I want you to do a fun photo and/or paper and/or 3d collage of your dream boyfriend or girlfriend! It doesn't have to have a background or be serious. Experiment with some different techniques or play around, it doesn't have to be extensive. You can use magazines photos for this.

Make sense? HAVE FUN!!

Self portraits


Done with Prismacolor markers.
The first one is actually the last one I did. It's not *quite* finished because the marker I was using was dying x__x You can see a little bit towards the right that it wasn't going to make it much longer....

its me! in three minutes


I dont even know haha

selves


ugh okay i know these are bad and i didn't even realize i did them from the same angle but i have work so up they go

the third is traditional and i didn't scan it because i'm smart. i'll edit it into the post right after class. oh hey here it is

Lookin classy


I chose to do my self portraits digitally because that's the hardest for me! I thought I looked a bit like Harry Potter in the first one so...I drew in his scar. The second is supposed to be looking slightly up and tilted to the side. The last is a surprise blind contour! It's crazy how much harder it is to approximate distance on a tablet as opposed to paper...

Monday, March 29, 2010

Self portraits by Alice


I was going to have the first portrait be the nontraditional project but it didn't seem to follow the assignment. S:

Three Heads

Normal pencil (I decide to use pencil first to see the change of portaits by changing medium
Sharpies

Oil pastels (it's my first time using one)


Self Portraits. Quick 15 mins. a piece


15 min self potraits
pretty quick
yep.

Portraits


the bottom one, the collage with ink, that one is supposed to be my head lifted up higher, it ended up looking too similar to the marker one,

Sunday, March 28, 2010

15 min. Self Portraits


Ahaha..... These look scary....I think I'm getting more use to digitally painting though.
<3 Ace

Saturday, March 27, 2010

ARTIST PRESENTATIONS: LINKS

Hi! I hope you all see this.
I was wondering if the people who HAVE done their artist presentations wouldn't mind putting the links to their artists in the comments of this post?
I thought would be a good resource for the rest of the class and can help the people who will be doing presentations soon (like me!) to know which artists have been covered.

And anyone is more than welcome to add new artists to the list!

Thanks guys,
Alice.

Wednesday, March 24, 2010

Barnaby Ward


Hey dudes
I wanted to share this artist that I just stumbled across while doodling around on the web.

http://somefield.com/

I think he's my new favorite illustrator. Not like I don't have a new favorite every day or anything.

ENJOY THE AWESOME

nontradselfport!

Throw out your myspace photos & grab your art supplies, it's self-portrait time!!

Though beautiful, this does not qualify as a "Non-tradional self portrait"

Blog assignment:
3 traditional self portraits (i.e. Sitting in front of a mirror and drawing/painting observationally) from 3 different angles. Use strong lighting, it will be easier and more interesting! These don't have to take a super long time either, maybe 10 minutes each or a bit longer if you like. Notice how the light and shadow planes on your face can change drastically depending on which angle you're at.

Class assignment:
NONtraditional self portraits! This self portrait shouldn't look like your blog assignment self portraits! This self portrait is telling us more about you, and not necessarily about the way you look. Be creative with this and have fun--you can use whatever media you like!

I got most of the self portraits I showed in class from Issue 8 of IdeaFixa magazine-- you can check out their archives at ideafixa.com. (go to "outras edicoes" and click the white cover that says "self portrait")

Wednesday, March 10, 2010

Blind contours get


Terribly late. The prince is there for scale and comparison?

Tuesday, March 9, 2010

Review: Separating Line work/Textures for coloring

So, some of you were still confused about how to do this, so I thought I'd post this to help: Separating line work (like we did in the first assignment, also applies to making textures you can color))

Make sure your drawing is in Grayscale. Image > Mode > Grayscale

You can make the black and white more crisp by going into Image > Adjustments > Levels.

Once you have that worked out, Go into Channels (if it's not on your screen, go up to Window > Channels) and click the dotted circle on the bottom. When you hover your mouse over it, it says "Load Channel as Selection"

Then go up to Select > Inverse.

Go back to your Layers window, and make a new layer. (make sure you're making a new layer and not a new channel)

Make sure you are in your new layer, have Black as your color, and then Edit > Fill

You can then Select > Deselect.

You can now change your image to color! Image > Mode > RGB

To lock the layer so you can color the lines, click the CHECKERED SQUARE in the "Lock" row near the top in your Layers window. A lock will show up on the right of the layer. (NOTE: there is an actual "lock" icon in the Lock row in the Layers window, but that does not do the same thing!)


blind contours are hard! ...i always find myself peeking, and it's hard to keep it going slow and steady. :l I wish I'd remembered to do these at lunch/dinner sometime where there are people...instead of in my dorm and abandoned hallways/classrooms. meh.

my tired class and a ds


ayoup fifteenssss

-xanthe


blind contours of statues and things in my room mostly